Are you looking to create a sleek, modern aesthetic in your living space? Wall-mounting your TV can be a game-changer. Not only does it free up valuable floor space, but it also adds a touch of elegance to your entertainment area. The idea of tackling this project might seem daunting at first. You can easily achieve a professional-looking result with the right tools and a step-by-step guide. In this comprehensive article, we will walk you through everything you need to know about wall-mounting your TV, from the essential tools to the safety precautions and common mistakes to avoid. Whether you’re a seasoned DIY enthusiast or a novice looking to take on a new challenge, this guide is your go-to resource for a successful TV wall-mounting project. So, let’s dive into the nitty-gritty of the process and transform your viewing experience.
What does it mean to wall-mount a TV?
Wall-mounting a TV refers to the process of fixing a television to a wall surface using a designated wall mount or bracket, such as those offered by Vogel’s, to create a space-saving and aesthetically pleasing setup.
Not only does wall-mounting a TV free up valuable floor space, but it also enhances the overall ambience of a room by offering a clutter-free and streamlined appearance. By utilising VESA standards, the mounting brackets ensure a secure and stable attachment, providing peace of mind for homeowners. In addition, brands like Vogel’s offer innovative mounting solutions with easy installation and adjustment features, allowing users to find the optimal viewing angle effortlessly. This convenience, combined with the modern and sleek design of the mounts, contributes to a more enjoyable and immersive viewing experience.
Why Should You Wall-Mount Your TV?
Wall-mounting your TV offers numerous advantages, including maximising space, enhancing viewing angles, and creating a sleek and modern look in your living space, especially when facilitated by professional installers like ‘Elite AV Services’, using reliable mounts such as those from Sanus.
By freeing up floor space, wall-mounting a TV contributes to a more open and clutter-free environment, ideal for smaller areas or rooms with limited space. This approach not only keeps the area organised but also allows for greater flexibility in furniture arrangement.
With the TV securely mounted on the wall, viewers can achieve optimal viewing angles, reducing neck strain and enhancing the overall viewing experience. The aesthetic appeal of a seamlessly mounted TV adds a touch of elegance and sophistication to the room, creating a focal point without the need for bulky entertainment centres.
What Tools Do You Need to Wall-Mount a TV?
To successfully wall-mount a TV, essential tools such as screws, a drill for creating pilot holes, cable management solutions, VESA-compliant mounting hardware, and the knowledge of locating studs or securing to plasterboard are essential for a secure and professional installation.
When mounting a TV, the use of screws is crucial for securely attaching the mounting brackets to the wall. The drill comes in handy for creating pilot holes, ensuring proper alignment and preventing damage to the wall. Cable management solutions help organise and conceal unsightly cables for a cleaner look.
It’s essential to use VESA-compliant mounting hardware to ensure compatibility with your TV. Understanding the wall’s construction is also important, as finding and securing studs provides the best support, while special techniques are required when mounting to plasterboard.
How to Wall-Mount Your TV: Step-by-Step Guide
Wall-mounting your TV involves a series of precise steps, including choosing the suitable wall mount, locating and marking studs, drilling mounting holes, ensuring level positioning, and securely attaching the TV to the wall using robust brackets, especially when dealing with brick walls.
Once you have selected your wall mount, the next crucial step is identifying the studs in your wall. Use a stud finder to locate the wooden beams behind the plasterboard – this ensures the TV is mounted securely. Mark the stud locations clearly with a pencil or tape.
After marking the studs, carefully drill the mounting holes and use the appropriate drill bit for the wall material. For concrete walls, you will need specialised masonry drill bits. Once drilled, insert wall anchors or toggle bolts into the holes to provide a secure attachment point.
Ensuring the level positioning of the wall mount is critical to achieving a professional and aesthetically pleasing installation. Use a spirit level to verify the mount’s alignment in both horizontal and vertical orientations, making adjustments if necessary.
When dealing with concrete walls, it’s vital to consider the additional strength and durability required for mounting. Opt for heavy-duty fixings and robust brackets designed specifically for brick wall installations to ensure a secure and stable attachment for your TV.
Step 1: Choose the Right Wall Mount
Selecting the appropriate wall mount for your TV, ensuring compatibility with VESA standards and the specific model of your television, is crucial for a secure and reliable installation, with options available through reputable retailers like Curry’s.
When considering VESA compatibility, it’s important to match the mount’s pattern with the VESA pattern of your TV, ensuring a proper fit. Choosing suitable brackets that correspond to the size and weight of your television is essential for optimal support and stability.
Curry’s offers a range of wall mounts from trusted brands, providing quality assurance and reliability for your installation needs.
Step 2: Find the Studs in Your Wall
Locating the studs in your wall is critical to ensure the wall mount’s secure attachment, requiring stud finders or professional assistance from certified installers like ‘Elite AV Services’, especially for newer constructions with 24-inch stud spacing.
Studs are crucial in supporting heavy fixtures, such as TV mounts or shelves, ensuring they remain securely in place. While stud finders are a popular choice for DIY enthusiasts, engaging the services of professionals can guarantee expert installation and support, particularly in cases where the spacing between studs deviates from the traditional 16-inch standard, as seen in many newer constructions.
Step 3: Mark the Mounting Holes on the Wall
After identifying the stud positions, carefully marking the precise locations for the mounting holes on the wall and considering the wall material, such as plasterboard or brick, are crucial to ensure accurate and secure attachment of the wall mount.
When marking the mounting holes, it’s essential to use a spirit level to ensure they are aligned correctly. For plasterboard walls, pre-drilling pilot holes can help prevent cracking. Alternatively, a masonry drill bit and wall anchors should be used for brick walls to provide a solid and secure hold.
Once the holes are marked and any necessary preparations are made, the next step is to carefully drill the holes, ensuring they are the correct depth for the type of wall material. Ensuring precision here is crucial, as improperly drilled holes can compromise the stability and safety of the wall mount.
Step 4: Drill Holes for the Mounting Screws
Drilling pilot holes for the mounting screws in the marked positions, using appropriate drill bits for brick or plaster walls, is essential to prepare the wall surface for secure attachment of the mounting brackets and the subsequent TV installation.
The process of drilling pilot holes serves as a crucial preliminary step before mounting any heavy object on a wall. When drilling into brick walls, it is imperative to use masonry drill bits specifically designed for this material. For plaster walls, wood or metal drill bits should be used. This differentiation in drill bits is essential to ensure efficiency and prevent damage to the wall and the drill bits themselves.
It’s also important to consider the depth of the holes, which should match the length of the mounting screws to avoid any instability. Ensuring the drill is perpendicular to the wall surface is vital for straight and precise holes, which is fundamental for a secure attachment.
Step 5: Attach the Mounting Bracket to the TV
Attaching the mounting brackets to the back of the TV, aligning with VESA standards and utilising appropriate screws whilst managing the associated cables is a crucial step to preparing the TV for mounting on the wall securely and reliably.
Ensuring that the mounting brackets are designed to fit the exact VESA pattern of the TV is essential for a secure attachment. Once aligned, carefully inserting the screws and tightening them firmly guarantees a stable and safe installation.
Organising and securing the cables with cable management solutions enhances the setup’s aesthetics and prevents any potential hazards or disruptions.
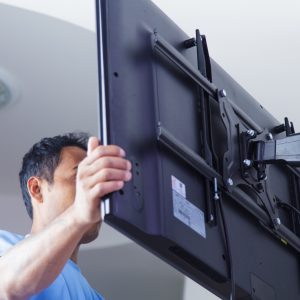
Step 6: Lift and Mount the TV on the Wall
Hoisting the TV and securely mounting it on the wall bracket, ensuring level positioning and robust attachment to the installed brackets, is a critical step that requires precision and care to achieve a seamless wall-mounted display.
Before initiating the hoisting process, it’s advisable to double-check that the wall bracket is securely and accurately installed on the wall, as any misalignment or instability at this point could compromise the subsequent steps. Once confirmed, ensure that all the necessary mounting hardware is readily available, including screws, anchors, and a reliable stud finder to locate the wall studs for maximum support.
During the hoisting phase, it is essential to have a capable assistant to assist with handling the TV, especially for larger screens. Gradually hoist the TV onto the wall bracket, carefully maintaining the level positioning throughout. Using a spirit level can be immensely helpful in achieving this.
Step 7: Secure the TV to the Mounting Bracket
Ensuring the secure fastening of the TV to the mounting bracket, utilising appropriate screws and brackets as per the manufacturer’s recommendations, is vital to guarantee the stability and safety of the wall-mounted TV setup.
It is crucial to assess the weight-bearing capacity of the wall and select anchors designed to support the TV’s weight. Additionally, screws should be tightened firmly, but not excessively, to avoid damaging the TV or the wall. Adhering to the manufacturer’s guidelines for the distance between the brackets and ensuring they are level is essential for even weight distribution and stability.
Step 8: Conceal Cables and Wires
Concealing the cables and wires associated with the wall-mounted TV, employing cable management solutions and appropriate installation techniques, is essential to achieve a tidy and professional aesthetic while maintaining functionality and safety.
Utilising cable trunking or conduits allows for seamless integration of the cables within the walls, creating a clean and uncluttered appearance. Recessed power outlets behind the TV eliminate visible cables, enhancing overall visual appeal. It’s imperative to consider the TV’s weight and select suitable wall mounts to ensure secure positioning, promoting safety and stability.
Bundling and organising the cables with cable ties or clips prevents tangling and tripping hazards, contributing to a hazard-free environment. Concealing cables elevate the room’s ambience and facilitate easy cleaning and maintenance. The process goes beyond mere aesthetics and significantly enhances the overall experience of enjoying a wall-mounted TV.
What Are the Safety Precautions for Wall-Mounting a TV?
When wall-mounting a TV, it is crucial to observe safety precautions such as verifying wall structure and load-bearing capacity, using appropriate hardware, and following manufacturer guidelines to ensure a secure and hazard-free installation.
Before beginning the installation process, identify the wall type, ensuring it can support the TV’s weight. For stud walls, locate and mark the studs using a spirit level to position the mount accurately. It’s essential to use high-quality coach screws or wall plugs that are designed for the wall material and load requirements. Adhere to the weight limits specified by the manufacturer to prevent overloading the mount.
Following the manufacturer guidelines regarding placement, spacing, and mounting procedures is integral to ensuring the structural integrity of the TV mount. Avoiding potential hazards like electrical wires or plumbing behind the wall is equally crucial. Double-check all connections and ensure the mount is securely attached before mounting the TV.
What Are the Common Mistakes to Avoid When Wall-Mounting a TV?
Avoiding common mistakes during the wall-mounting process, such as inadequate stud identification, improper hardware usage, and disregarding weight limits, is essential to ensure a successful and durable TV installation, especially for compliance with installation standards in 2024.
Identifying the studs is crucial to ensure the TV mount is secured correctly. Many individuals make the mistake of not using a stud finder or relying on inadequate methods, leading to instability and potential damage to the wall. Selecting the proper hardware, including screws, bolts, and anchors, is imperative to support the weight of the TV and mount. Using subpar or incorrect hardware can lead to the TV falling, which can be dangerous and damaging. Considering the weight limits of both the TV and the mount is also vital, as exceeding these limits can lead to structural damage and safety hazards.
How to Remove a Wall-Mounted TV?
Removing a wall-mounted TV involves carefully uninstalling the brackets, assessing the wall condition, and employing appropriate techniques, especially when dealing with brick walls, to ensure the safe and efficient dismantling of the TV setup.
First, before beginning the uninstallation process, it’s crucial to power off and unplug the TV and any connected devices to ensure safety. Then, carefully remove the brackets and screws securing the TV to the wall, making sure to support the TV’s weight to prevent any accidents.
Next, assess the condition of the wall by examining it for any damages, such as cracks or holes, which may require repair after the removal. If you are dealing with a brick wall, it’s essential to use specialised tools and equipment suitable for concrete surfaces to avoid damaging the wall structure. Always consider seeking professional assistance if you are unsure about the process or if it involves complex wall structures, especially brick walls, to guarantee a safe and successful removal process.
Frequently Asked Questions
What tools and materials will I need to wall-mount my TV?
To wall-mount your TV, you will need a stud finder, a drill, a level, a socket wrench, a screwdriver, mounting hardware, and a TV mount designed for your specific TV model.
How do I know where to mount my TV on the wall?
The ideal height for wall-mounting your TV is eye level when seated. Use the stud finder to locate the studs behind the wall, where you must securely attach the TV mount.
Can I mount my TV on any wall?
Mounting your TV on a solid wall, such as concrete or brick, is recommended. Plasterboard can also be used, but locate the studs for proper support.
How do I ensure my TV is level when mounted on the wall?
Use a level to ensure the TV mount is straight before drilling into the wall. Having a second person assist you during this step is also a good idea to ensure accuracy.
What is the best way to hide the cords for my wall-mounted TV?
There are a few options for hiding cables when wall-mounting your TV. You can purchase a cable cover or trunking to conceal the cables or hire a professional to run the cables through the wall for a cleaner look.
Can I mount a TV by myself, or do I need help?
While it is possible to wall-mount a TV by yourself, having a second person assist you is recommended, especially when dealing with heavier TVs. This will ensure safety and accuracy during the installation process.