Introduction to Satellite Dish Alignment
Imagine settling down to watch your favourite show, only to be greeted by a pixelated screen. Frustrating, right? The culprit is often a misaligned satellite dish. Aligning your satellite dish is crucial for a crystal-clear reception. It’s not just about a few bolts and angles; it’s about ensuring uninterrupted, high-quality satellite service. Whether battling the aftermath of a storm, installing a new dish, or performing routine maintenance, understanding the basics of satellite dish alignment can save you from blurry screens and dropped signals. In this guide, we’ll explore the importance of dish alignment and set the stage for a DIY journey to better television viewing.
Essential Tools and Equipment for Alignment
Embarking on the journey of aligning your satellite dish? Your toolbox is your best ally. The right tools make the process smoother and ensure precision – a non-negotiable in dish alignment. Here’s what you’ll need:
- A Sturdy Ladder: Height is essential in dish alignment. Choose a ladder that safely reaches your dish’s location.
- Spanner Set: Various bolt sizes on your dish call for different spanner sizes. A set ensures you’re ready for any adjustment.
- Satellite Finder App: Modern problems require modern solutions. Apps like Dishpointer or Satellite Pointer guide you to the perfect alignment spot.
- Compass: For the traditionalists, a compass is indispensable in finding the right azimuth direction.
- Digital Receiver/Decoder: This device helps fine-tune the alignment through its signal strength indicators.
- Television: Essential for real-time feedback on signal quality as you adjust.
- Signal Meter/Finder: A more direct way to gauge signal strength, leading to a precise alignment.
Equipped with these, you’re set to tackle dish alignment with confidence. Remember, the right tools don’t just make the job possible; they make it easier.
Step-by-Step Guide to Aligning Your Satellite Dish
Aligning a satellite dish might seem daunting, but with the proper steps, it’s a task you can confidently accomplish. Here’s a straightforward guide to get you from fuzzy to clear in no time:
- Select the Perfect Spot: Start by choosing a location with minimal obstructions. A clear line of sight is vital, so avoid trees, buildings, and other barriers. Ideal spots are usually roofs or high up on the wall.
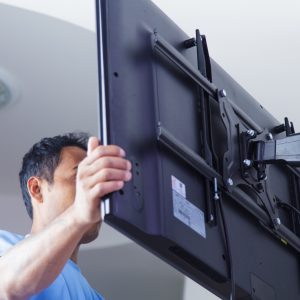
- Mount the Dish: Securely attach the mounting plate at your chosen spot using a drill and screws. Stability here is vital for accurate alignment.
- Attach the Dish: Follow the manufacturer’s instructions to mount the dish onto the bracket. Leave the bolts slightly loose – you’ll need to adjust the dish’s position.
- Connect the Cables: Run the coaxial cable from the dish’s LNB to your receiver. Then, connect the receiver to your TV and power them up.
- Initial Dish and Receiver Setup: Insert the provided card into the receiver and use the manual to set up both the dish and receiver. Note down the recommended direction and elevation level from the setup.
- Align the Dish: With a compass, align the dish according to the setup specifications. Adjust the elevation based on the recommended level and tighten the bolts once aligned.
- Signal Hunting: Use a signal finder to check the signal strength. Adjust the elevation slowly to achieve a strong signal. A helper inside to monitor the TV signal can be a great aid.
- Secure Everything: Once aligned with a strong signal, secure all cables inside and out. Even minor movements can disrupt signal quality, so ensure everything is tightly fixed.
Congratulations! You’ve aligned your satellite dish, paving the way for crystal-clear television viewing.
Adjustments: Azimuth, Elevation, and LNB Skew
Fine-tuning your satellite dish involves three critical adjustments: Azimuth, Elevation, and LNB Skew. Here’s how to nail each one:
- Azimuth Adjustment: This is about the east-west orientation of your dish. Use a compass or a satellite finder app to identify the correct direction. Once you’ve got the bearing, rotate the dish accordingly. A minor tweak here can significantly boost signal strength.
- Elevation Adjustment: This involves the vertical angle of your dish. Getting the elevation right is crucial as it affects how high or low your dish points. Use the DishPointer app to find the precise elevation angle. Adjust the dish until it aligns perfectly with this angle. Remember, after adjusting elevation, a recheck of the azimuth is a good practice.
- LNB Skew Adjustment: The LNB (Low Noise Block) skew is about rotating the LNB to the correct angle. This adjustment fine-tunes your dish’s ability to receive signals. The skew angle varies depending on your location and your target satellite. The DishPointer app can help determine the right skew angle for your setup. Adjust the LNB bracket until it’s just right.
These adjustments are interdependent. A change in one might require a slight tweak in the others. When done right, it’s a balancing act that leads to optimal signal strength and quality viewing.
Tips to Aim and Align a Satellite Dish
Nailing the alignment of your satellite dish is both an art and a science. Here are some expert tips to ensure you get it right:
- Start with Stability: Ensure your dish is mounted on a solid surface. Stability is vital to prevent shifting during alignment.
- Leave Room for Adjustment: Allow extra space around the dish mount for fine-tuning. This flexibility is crucial for making those minor yet impactful adjustments.
- Regular Signal Checks: Keep a close eye on the signal strength as you adjust. An increase in signal strength or a beep from the meter indicates you’re on the right track.
- Two is Better Than One: Having a friend to help can make the process smoother. One can adjust the dish while the other monitors the signal strength inside.
- Precision is Key: Small adjustments can make a big difference. Take your time and make incremental changes for the best results.
- Use Technology Wisely: Leverage apps and tools like Dishpointer for accurate directions and angles. They take the guesswork out of the equation.
- Patience Pays Off: Aligning a satellite dish isn’t a rush job. Take your time to ensure each adjustment is done correctly.
By following these tips, you’re setting yourself up for success in achieving a perfectly aligned dish, ensuring a great viewing experience.
Aligning a Satellite Dish Without a Meter
Believe it or not, aligning your satellite dish without a fancy meter is entirely feasible. Here’s how to do it with tools you likely already have:
- Understanding Built-in Meters: Modern satellite receivers come with built-in signal meters. While not as quick as professional meters, they are effective for DIY alignment.
- Accessing the Meter: On your receiver, navigate to the satellite setup menu. This involves going through settings to find the ‘Signal Strength’ option for most systems.
- Real-Time Adjustments: As you adjust your dish, keep an eye on the receiver’s signal meter. Be patient – it might take a moment to update with changes.
- Teamwork Makes the Dream Work: This method works best with two people – one adjusting the dish and the other monitoring the signal strength indoors.
- Slow and Steady: Make minor, gradual adjustments to the dish. Sharp movements can overshoot the optimal signal zone.
- Listening for Cues: Some receivers provide auditory signals (like beeps) that increase in frequency as the signal strength improves. Use these cues to guide your adjustments.
Following these steps, you can align your satellite dish without a meter, using just your receiver’s built-in tools and some patience.
FAQs
- What is the correct angle for a satellite dish?
- The correct angle varies based on geographic location and your target satellite. Generally, it’s a south-to-southeast direction for those in the northern hemisphere. Use a compass or an alignment app to find the precise angle for your location.
- What direction do most satellite dishes face?
- Most satellite dishes face south. This orientation allows them to receive signals from geostationary satellites orbiting the equator.
- Is there an app to align a satellite dish?
- Yes, several apps like Dishpointer and Satellite Pointer help align satellite dishes. These apps use augmented reality and other tools to assist in finding the best position and angle for your dish.
- Why does a satellite dish need to be earthed?
- Grounding a satellite dish is crucial for safety. It provides a path for electrical surges, protecting your equipment from lightning strikes and reducing the risk of electrical fires. Additionally, it can enhance signal quality by minimising interference.
- How often should a satellite dish be realigned?
- Generally, a satellite dish should be realigned if you notice a drop in signal quality or after a major weather event. Regular maintenance checks every few years can also ensure optimal performance.
- Can trees and buildings affect satellite dish alignment?
- Trees, buildings, and other obstructions can block the signal path between the satellite and your dish. Choosing a location with a clear line of sight to the sky is essential.
- What’s the best way to ensure accurate alignment?
- Using tools like a compass, alignment apps, and a signal meter, along with patience and precise adjustments, is the best approach to ensure accurate satellite dish alignment.